Learning Objectives
After completing this lesson, the student will be able to diagram, compare and contrast the relative contributions to thrust from pushing, pulling, or flapping forces in tuna, jellyfish and stingrays.
Next Generation Science Standards
- NGSS-HS-PS2 “Motion and Stability: Forces and Interactions”
- NGSS-HS-Life Science “Structure and Function”
Common Core State Standards
- CCSS.Math.Practice.MP3 “Construct viable arguments and critique the reasoning of others.”
Supplies
- Plastic tub
- Ruler with cm/mm
- 1x food coloring bottle
- 2x fish models
- 1 angelfish
- 1 tuna fish
- 1x Air-dry clay packet
- Paper to write on
- Something to record time (can use phone)
- Soda can
- Candle
Units Used
- Mass: kilogram (kg)
- Length: meter (m)
- Time: second (s)
- Force: Newton (N) (1 N=1 kg m/s2)
Part A: Structure and Function
When a balloon is pulled through the air, the force of movement is generated from the front by dragging the string. When real animals move, their propulsion is generated typically from the back or side. Fish primarily generate forward force or ‘thrust’ by rhythmically moving tail fins back and forth. Manta rays flap their pectoral fins up and down (dorsoventrally), and jellyfish contract their bodies. These marine animals must generate a sufficient propulsive force, thrust, to overcome drag in order to move forward.
On the sketches of the tuna, manta ray and jellyfish below, indicate where the forces from pushing, pulling, or flapping, e.g. thrust, occur.

Part B: Experimentation
Let’s do an experiment using fishbots to determine if body shape matters. To visualize how body shape impacts a fish’s ability to move through water, we will focus on two differently shaped fish robots, one emulating a short-bodied swimmer, an angelfish, and one mimicking a long-bodied swimmer, a tuna. This activity can be done alone or in small teams.
- Fill the included tub roughly 2/3 with water. It should be deep enough for the fish to swim in and for dye to distribute without immediately spreading through the whole tank.
- As a demonstration, select one fish robot, it can be either of the two types. Place it in the water and observe how it swims. Describe where the forward propulsion force originates. How does it move?
- Next, each team/person will select a different DRY fish robot. Dye will not stick to wet fish! If you use the same fish, dry it off well.
- To determine the range of tail movement:
- Place your fish on a piece of paper.
- Measure the height furthest from the base and measure the width at the base.
- Gently push the tail to the leftmost and rightmost positions, marking each point with a dot on a piece of paper under the fish. Connect these two dots – this gives your tailbeat distance.
- Record the sizes measured in the data table below.
- When your fish is in the water, using the ruler you will record the width of the initial and final dye spread as it swims.

- Place a paper towel under the fishbot to keep your station clean.
- Hold the fishbot over the towel and add 2-3 drops of food coloring along the top of the fish’s body. Because it is plastic, some of the dye may roll off, but as long as one or two drops stays on top it is sufficient.
- Team members who are not launching the fish bot should be ready to measure the dye spread. If working alone, stretch a ruler across the tub, and be ready to record a video that you can look at later to check the spread.
- Record the width of the dye spread when you place the fish in the water, at 10 secs, 20 secs and 30 secs.
- Once dye is added, the fish are ready to swim. Carefully place the robot into the water. Fishbots are water reactive and will begin swimming immediately, so they do not need to be turned on. The fish should be able to swim in a straight line for a few seconds, enough for data to be collected. If the fish tries to turn, gently and quickly redirect it.
- To repeat with a new fish, you may have to fill the tub with clean water so you can observe the dye patterns better.
| Robot Type | Width of Dye Spread | Observations |
|---|---|---|
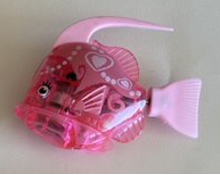 Angel fish’ bot (short-bodied swimmer) | At 0 seconds (initial) At 10 seconds: At 20 seconds: At 30 seconds: | |
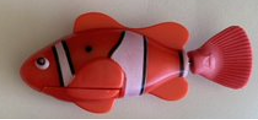 Tuna bot (yes, we know this is Nemo, a clown fish, we’re going for a long-bodied swimmer) | At 0 seconds (initial): At 10 seconds: At 20 seconds: At 30 seconds: |
Discuss the following with a team that had a different fish, or compare both fishbots on your own after completing the activity using each model:
- Which type of fish appeared to swim faster?
- Which fish swims straighter, which makes sharper turns? How may this be an advantage or disadvantage for survival?
- Compare and contrast how the dye spread varied for the different shaped fishbots.
- Where did the propulsion come from?
Now, consider how the fish could be improved…
- What part of the body could be modified to increase thrust?
- If fins were modified to be longer, taller, wider, smoother how might this impact propulsion?
The body shape of fish is not the only anatomical trait that comes into play. Consider the fish’s fins as well…For the next activity, we will be testing out how different fin and tail shapes, sizes, and aspect ratios impact the way the fish swims, and how that affects the fluid surrounding them as well.
Part C: Fin Modification
- Retrieve the packet of air-dry clay that came with the kit.
- Look at the fins already present on the bots and consider the fins of real-life fish. What are the benefits of having small, angular fins? What about big, showy ones?
- Create a few different tail shape types for your robot fish. The clay should adhere directly to the bot’s body, and it does not need to be completely dry to work for this activity, just firm enough to hold its shape.
- As you add fins, you are adding weight as well. How does this impact the fish’s center of gravity?
- To add the caudal (tail) fin, position it close to where the robot’s original fin is so the bot’s motor can still move it.

- Repeat the previous experiment with the dye using the new tails, and see how the flow of water changes using food dye. Observe how much force each fin type produces, and take note of how the flow behaves – is it turbulent? Is there a lot of splashing?
- Don’t worry so much about recording data here, this is more so for observation.
- You are encouraged to try out multiple fin shapes and sizes here!
- In nature, high speed swimmers like tuna fish have a high aspect ratio between their tail and the attachment point (caudal peduncle), meaning their bodies narrow out towards the back and then have a tall and thin tail.
- Slower swimmers have a lower aspect ratio. The height of their tails is similar to the height of the attachment point.
- Did you notice this same concept apply in the activity? Why do you think aspect ratios matter?
Bonus: Coanda Effect
As a fish flaps its tail, an interesting phenomena comes into play called the Coanda effect. The Coanda effect describes how a fluid jet will follow a curved surface. To see this in action, grab a soda can and a small candle. Place the can on its side. With adult supervision, light the candle and place it behind the can. Stand in front of the can, where you no longer see the candle, and blow. Did the candle blow out? If so, you just witnessed the Coanda effect!
Last updated June 1, 2022.
