Learning Objectives
After completing this lesson, the student will be able to diagram, explain, and compare and contrast life history components of tuna, jellyfish and stingrays as they relate to swimming, feeding and escaping predation.
Next Generation Science Standards
- NGSS-HS-PS2 “Motion and Stability: Forces and Interactions”
- NGSS-HS-Life Science “Structure and Function”
Common Core State Standards
- CCSS.Math.Practice.MP3 “Construct viable arguments and critique the reasoning of others.”
Supplies
- Helium tank
- 2x party balloons
- 1 long balloon
- 1 round balloon
- 1-2 sheets of construction paper
- Scotch tape
- Scissors
- Pack of air-dry modelling clay
- Worksheet comparing and contrasting life histories and body shapes of tuna, stingray, and jellyfish.
- 2x threads, one for each balloon
Units Used
- Mass: kilogram (kg)
- Length: meter (m)
- Time: second (s)
- Force: Newton (N) (1 N=1 kg m/s2)
Part A: Visualizing Life Histories of Tuna, Stingray, Jellyfish
To introduce the topic watch this short comparative video on life histories of tuna, stingray, and jellyfish. (Video coming soon)
As you watch, fill in this worksheet which covers some basic details on how each organism moves, feeds, and the phases of their life cycle. While working on the sheet, begin thinking about how you can apply what you have learned to a ‘fish’ you will design next in the lesson activity. Consider how body shape, fin number and type, and environment influence propulsion.
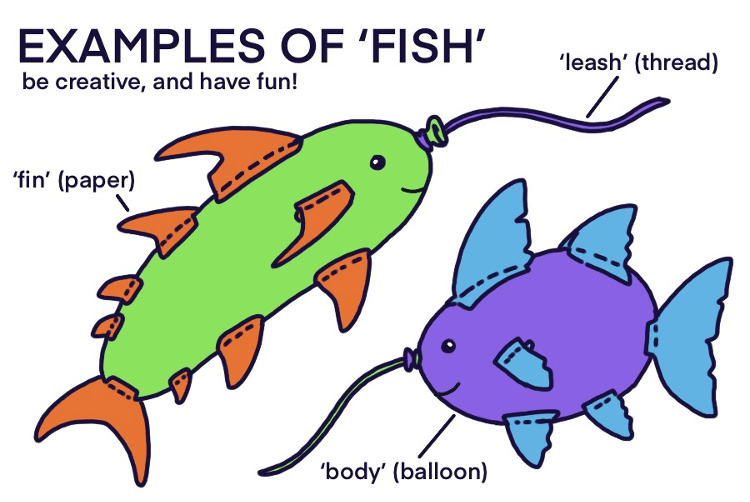
Part B: Constructing a ‘Fish’
Challenge 1: Create a fish with at least two fins and a tail that can remain neutrally buoyant at rest, and then can ‘swim’ towards a prey item.
Review the worksheet showing functions and locations of fins and tails. Decide on the number and placement of fins, as well as shape and orientation of tail of your fish.
- Select a balloon shape to represent your ‘fish.’ When choosing, consider how the size and shape will influence how the ‘fish’ swims. Inflate your balloon with helium to the point where it can float. It is up to you how big you wish to inflate it, but the balloon wall should be firm enough to attach things to.
- Tie a string around the mouth of your inflated ‘fish’ body that will serve as ‘a leash.’ Secure your balloon such that you can attach fins, so it does not float away.
- Sketch your desired fin shapes and a tail onto construction paper. They can be any shape or size. Keep in mind how the size and placement of your fins will affect the fish’s balance.
- After drawing out your fins, add another sheet of paper underneath (or fold the current one in half) — such that each fin will have two layers for support.
- Cut fins out once ready, and glue or tape the fin pieces together, leaving a bit of space at the bottom. Fold the un-taped parts into flaps and attach them to your fish with tape.
- Double layering should be enough to keep your fins rigid, but if they are still too floppy, consider sizing your fins down or adding another layer of support. Fins should be firm enough to stand up on their own.
- Pay attention to how the fish body’s weight and maneuverability changes as you add the fins. You may want to pull the fish around briefly to test out each fin usage. What happens to your fish when you add one fin? What happens when you add two fins? Does the shape, size, and placement of the fins make a difference?
- Describe what happens when you add on a tail.
- You want your fish to achieve neutral buoyancy, which means it should not sink or rise; it should just ‘float’ and be static at rest. Adjust your fins and tail if necessary. If you need more weight, you may use the putty and tape it to your fish.
- Be mindful of where putty is attached. Consider the center of gravity and center of buoyancy.
Consider the following questions before moving onto the next part.
- Why do balloons rise when filled with helium?
- What are the forces acting on your fish?
- When will the balloon stop rising?
- When it hits the ceiling or rises to a point where the density of the air outside the balloon equals the density of the helium inside the balloon. When these two densities are equal, there is no longer a buoyant force.
Challenge 2: Hunting for Food and Escaping Predation.
- Review the worksheet section on predation and swimming.
- Divide the class in half as Predator and Prey Teams
- Prey: The prey team will pull their fish by the string attempting to escape from predation as they slowly walk around the room. Before the activity begins, teams will secretly discuss strategies for evading predators (e.g., rapid swimming, hiding, ducking, squeezing into tight spaces, etc..). Multiple prey teams may work together on their strategies if desired.
- Predators: The predator teams will also discuss their strateg(ies) to chase and then ‘tag’ the prey fish by touching it with their balloon. Predator teams may also collaborate on their predation strategies if desired.
- When ready, the prey teams are given a 5 second head start to begin moving around the room pulling their fish by the strings. The predator teams will then pull their fish towards the prey fish. Students should walk at a steady pace rather than run.
- If the classroom is too crowded, some teams can potentially move out into the hall or outside to simulate other oceanic environments (for example, a crowded classroom could be compared to a coral reef with lots of hides, while an empty hall would resemble open ocean).
- Think about the demands of each environment. Where is agility and maneuverability the most advantageous? What about speed? What are the benefits and drawbacks of each? (Hint: Would it be easier or harder for a fish swimming very fast to make sharp turns? How does body shape and size play into it? Would it be useful to predators in open ocean to make tight turns in the first place?)
- Successful predation occurs when a predator fish balloon touches a prey fish balloon. Each round lasts a max of two minutes, so that multiple rounds may be played.
- Prey and predator teams may switch roles if enough time is left over.
- After each round, teams discuss what strategy worked well. Fins, tails, or weight may be adjusted as needed to improve efficiency.
- What forces were apparent? What additional body parts or forces would be helpful to add to your fish (i.e., propulsion mechanism?)
Bonus: Extension Activity using a Fish Example
Manta Ray example
In the predation simulation, we modelled hunting behavior off of solitary mechanics used by the animals introduced. But sometimes, independent hunters may group together to improve their yield. Manta rays, for example, are intelligent and capable of complex social interactions including group hunting and play behaviors. Watch this video to see group hunting in action.
As shown in the video, the mantas ‘stack’ on top of one another to enable the leader to consume more plankton, and take turns so each participant gets a fair share. If this mechanism works well for the rays, why not be group animals all the time? What are the benefits and drawbacks of working together or working independently in mantas, as well as the other organisms (tuna and jelly) we have discussed today? (Hint: Think about the environment. How easy is it to find other individuals out in the open ocean? What about competition for resources?)
Climate Change
Perhaps….as the water warms due to climate change in the North Atlantic, will the warmer water impact how jellyfish move with current or how fish swim? We do know that warm water holds less dissolved oxygen, and that commercially important fisheries are moving northward (e.g., cod). Will tuna be impacted? Learn more about tuna from NOAA here.
Last updated June 3, 2022.
